Mini FM Transmitter Module 76.0MHz-108.0MHz Single Channel Wireless Microphone Transmit Board Adjustable Sensitivity PLL DC 3-5V
Description
Description:
1.Output Power:100mW
2.Audio Frequency Response Range:50Hz-18KHz
3.Transmitting Frequency:76.0MHz-108.0MHz
4.Modulation Mode:standard FM
5.Sound Track:single channel
6.Power Supply Voltage:DC 3.0V-5.0V
7.Operating Current:35mA
8.Adaptive Antenna:75cm bar antenna
9.Modify frequency command: AT+FRE=875 (for 87.5 MHz)
10.Read frequency command: AT+RET
Features:
1.Adopt FM PLL Technique
2.Adopt Audio Low Noise Operational Amplifier as microphone amplification
3.Power Off Automatic Memory Previous Frequency
4.Adopt High Precision SMD Quartz Crystal Stabilizing Frequency
5.PC Port Configure Transmitting Frequency By Serial Port

Instructions:
<1>: Power
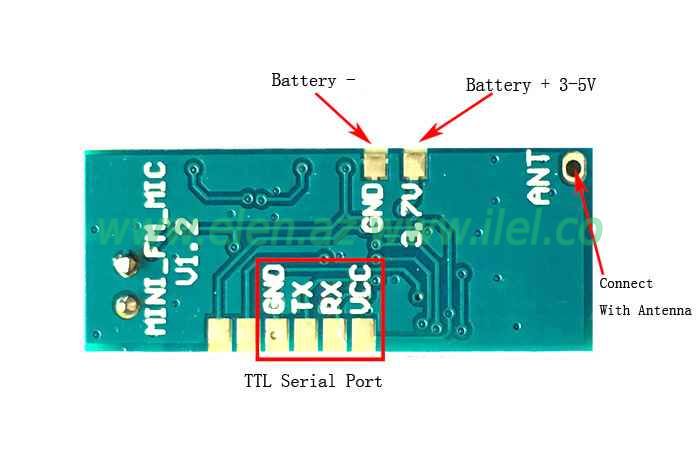
The back of the module corresponds to the port GND, and 3.7V is connected to the negative and positive terminals of the power supply (battery) respectively. The power supply is recommended to use a battery or a transformer step-down regulated power supply. Do not use switching power supplies without filters (such as mobile phone chargers, power banks, switching DC-DC power supplies), otherwise the high-frequency interference generated by the power supply part will affect the normal operation of this module. The normal working voltage of this module is 3.0-5.0V, and the power supply voltage should not exceed this range.
<2>: Antenna
The ANT port is used to connect the FM antenna. In order to better transmit FM signals, it is recommended to connect a 75cm-long whip antenna, and there should be no obstacles as far as possible near the antenna.
<3>: Frequency adjustment
This module needs to use a computer to configure its radio frequency point (refer to the frequency configuration method in the lower part of the details page for the specific operation method).
Matters needing attention:
1: Please confirm that the power supply polarity and power supply voltage are correct before turning on the power. If the input voltage exceeds 5V or the positive and negative poles of the power supply are connected reversely, it may cause permanent damage to the module.
2: Don't touch the back components of the module when working, so as not to affect the normal operation of the module.

Modify the microphone pickup sensitivity description:
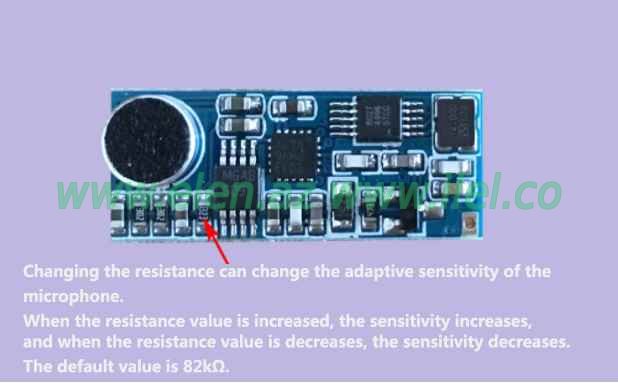
This module can change the microphone's pickup sensitivity by modifying the negative feedback resistance of the microphone preamplifier circuit, so as to meet the adaptation of individual users to the special sensitivity requirements. The factory default value of the negative feedback resistance of the microphone preamplifier is 82K ohms. Increasing this resistance increases the sensitivity of the microphone, while decreasing this resistance decreases the sensitivity of the microphone. Note: We only provide the modification method. If you want to change it, please buy it back and modify it yourself. All shipments are based on the default sensitivity. We do not change the sensitivity parameters for each customer.

Frequency configuration method and procedure:
1: USB to TTL module and the module connection method
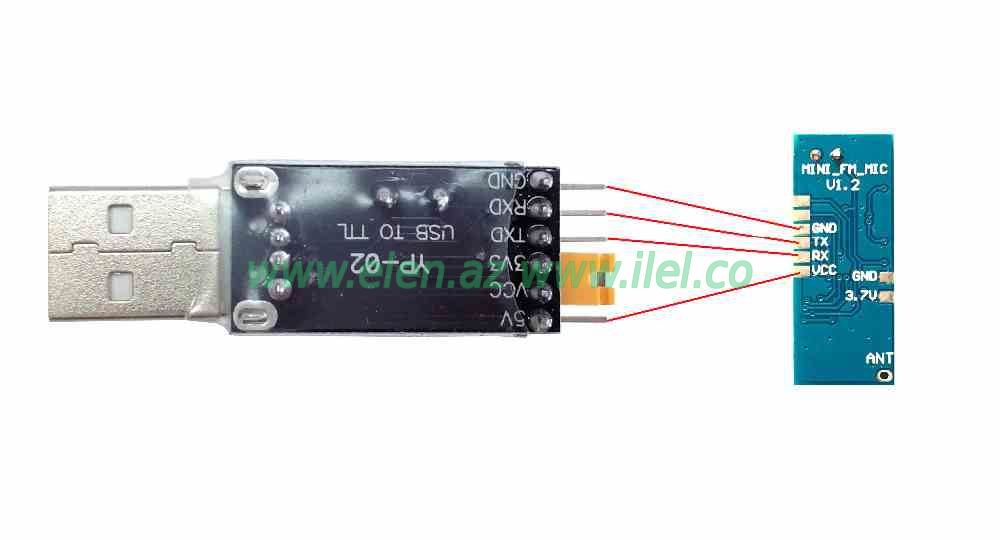
(1): Connect the GND, RXD, TXD and 5V ports of the USB to TTL module (need to be purchased separately) to the GND, TX, RX, VCC of the module
As shown below:

2: Install USB to TTL serial port module driver
(1): install CH341SER_V3.3USB to serial port module driver folder inside
CH341SER_V3.3 [2012-02] .EXE
(2): connect the USB to the serial port module and the module after the insertion of USB to serial module to the computer, waiting for the driver to install automatically, after the installation is complete automatically open the device manager to see USB to TTL module corresponding serial port number


